This is a tutorial of How to make Aii(Arduino and Wii Nunchak).
This exercise enables you to connect Wii Nunchuk to Arduino.
You will also learn how to connect Aii to Isadora and how to send a OSC data over the Internet(Wi-Fi).
Wii Nunchuk is a great tool for us. It has 7 different input device(two button, two potentiometer like function and one XYZ accelerometer)
Having an Accelerometer is really great, because the cost of accelerometer is from 19.95 to $39.95.(SparkFun.com) However, if you order Wii Nunchuk from Amazon.com, it costs only from $3.25 to $19.95.
I connect Nintendo Will Nunchuk to Arduino and made Aii.
The program was based on the information of http://www.windmeadow.com/node/42
I added little more cords so that it works with Isadora.
To make a circuit, I referred http://todbot.com/blog/2007/10/25/boarduino-wii-nunchuck-servo/
For the information of OSC transmission with Isadora, I referred http://vjskulpture.wordpress.com/2010/01/14/basic-open-sound-control-osc-isadora-mac/
Requirement
Arduino
Arduino program
Isadora
Wii Nunchuk
Wires(you may need alligator clips and soldering iron)
Two computer that is connected to a same router.
Red LED
Circuit
Program
You can use a program from http://www.windmeadow.com/node/42
But you have to change the function of void print() in the program to following.
void
print ()
{
int joy_x_axis = outbuf[0];
int joy_y_axis = outbuf[1];
int accel_x_axis = outbuf[2] * 2 * 2;
int accel_y_axis = outbuf[3] * 2 * 2;
int accel_z_axis = outbuf[4] * 2 * 2;
int z_button = 0;
int c_button = 0;
// byte outbuf[5] contains bits for z and c buttons
// it also contains the least significant bits for the accelerometer data
// so we have to check each bit of byte outbuf[5]
if ((outbuf[5] >> 0) & 1)
{
z_button = 1;
}
if ((outbuf[5] >> 1) & 1)
{
c_button = 1;
}
if ((outbuf[5] >> 2) & 1)
{
accel_x_axis += 2;
}
if ((outbuf[5] >> 3) & 1)
{
accel_x_axis += 1;
}
if ((outbuf[5] >> 4) & 1)
{
accel_y_axis += 2;
}
if ((outbuf[5] >> 5) & 1)
{
accel_y_axis += 1;
}
if ((outbuf[5] >> 6) & 1)
{
accel_z_axis += 2;
}
if ((outbuf[5] >> 7) & 1)
{
accel_z_axis += 1;
}
// This is a section that is actually modified.
Serial.print(1,DEC);
Serial.print (joy_x_axis, DEC);
Serial.println();
Serial.print(2,DEC);
Serial.print (joy_y_axis, DEC);
Serial.println();
Serial.print(3,DEC);
Serial.print (accel_x_axis, DEC);
Serial.println();
Serial.print(4,DEC);
Serial.print (accel_y_axis, DEC);
Serial.println();
Serial.print(5,DEC);
Serial.print (accel_z_axis, DEC);
Serial.println();
Serial.print(6,DEC);
Serial.print (z_button, DEC);
Serial.println();
Serial.print(7,DEC);
Serial.print (c_button, DEC);
Serial.println();
Serial.print ("\r\n");
}
// Encode data to format that most wiimote drivers except
// only needed if you use one of the regular wiimote drivers
char
nunchuk_decode_byte (char x)
{
x = (x ^ 0x17) + 0x17;
return x;
}
For more information check my tutorial of Isadora + Arduino
http://art-research2010summer.blogspot.com/2010/06/tutorial-01-isadora-and-arduino.html
Isadora
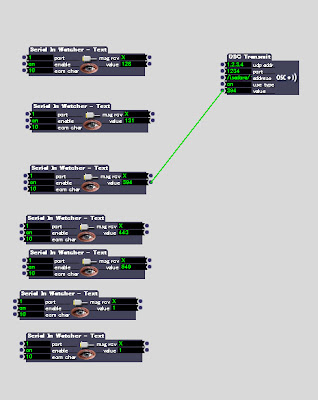
You do not do something special for Isadora but you have to make a lot of "Serial in Watcher".
Check below again to know how to do it.
http://art-research2010summer.blogspot.com/2010/06/tutorial-01-isadora-and-arduino.html
You need 7 "Serial in Watcher" to get all of the benefit of Wii Nunchuk
All of the "Serial in Watcher" need ideal number to identify each other.
Program for Isadora's Serial in Watcher(double click and open a window)
Serial in Watcher 1
"1"
StickA: integer = 4 digits
Serial in Watcher 2
"2"
StickB:integer = 4 digits
Serial in Watcher 3
"3"
Acc1: integer = 4 digits
Serial in Watcher 4
"4"
Acc2: integer = 4 digits
Serial in Watcher 5
"5"
Acc3: integer = 4 digits
Serial in Watcher 6
"6"
ButA:interger= 4 digits
Serial in Watcher 7
"7"
ButB: integer = 4 digits
Go to the OUTPUT and Setup Serial (choose Serial such as COM4 Speed 9600) and check Enable Serial
You can play around with Aii to see how these value will change.
Make "OSC transmit"
Setup IP address of the computer that you want to control and connect the value of the "OSC transmit" to the "Serial in Watcher" which you like.
Setup your another computer
If you do not know how to check your IP address, see my blog post about Arduino Server (below address).
http://art-research2010summer.blogspot.com/2010/06/arduino-ethernet-shield.html
Run Isadora in your another computer(in my case it is a Laptop).
Make a OSC listener, that it!.
You will get a value and you can use this value for anything that you want to use.
I use "Calculator" to adjust a value and connect it to "Dot" size.
You DONE


0 件のコメント:
コメントを投稿